In my Dynamics CRM career spanning so many years, I have come across more than a few customers requesting to Customize the dialog box that appears when a user clicks on the Opportunity Close button.
This is basically a way to capture the information when the opportunity is being closed. If it is won, then what was the Actual Revenue, when was it closed and any comments that the user may want to capture.
If it was lost then What is the reason (Cancelled, out-sold), when was it closed, who was the Competitor it was lost to, any comments, etc. This information captured through this dialog box helps the Sales staff make better decisions if they see some products/Salespersons are not doing well.
Up until now, there was no supported way to change the options on this window, however, with the recent update of Dynamics CRM, Microsoft has made it possible to make changes to it. Well, kind of.
Before you get all excited about this possibility, I want you to bring to your attention the first limitation of this feature and that is, that it is NOT possible to make changes to the Opportunity close dialog on the standard UI. Microsoft’s official page gives the below disclaimer:


I am actually not surprised by this limitation though. Considering the fact that in the near future Microsoft is planning to let go of the Standard Interface completely, why would they want to enable it anyway. So, it is what it is. If your client is still using the Standard interface then they will have to wait until they are ready to switch(or are forced to switch by Microsoft).
Anyways, let’s get on to the “How” part of this feature:
The very first thing to be done to enable customizations of the Opportunity close form is to go to the System Settings of your CRM instance and enable this particular option as shown in the screenshot here:

Once you have enabled it, you can go to your solution and add an existing entity called “Opportunity close” (Add both the available forms for this entity to your solution):
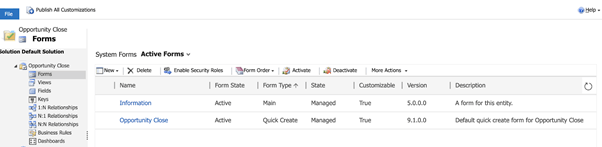
As you see in the screenshot, there are Forms for this entity that can be customized. So, you can remove the certain field and add custom fields to it to change the Opportunity close Quick Create form (since that is the form that opens up in the Unified interface if you click on the Opportunity close button).
You can also add certain validations to it, e.g. if you want that the user should enter the comments for sure before they close the opportunity. You CANNOT Delete out-of-the-box fields for this entity
And of course, there are some gotchas to make sure that the data is accurately captured and shown to the users:
- If an attribute needs to be captured on Opportunity close, that belongs to the Opportunity entity, you need to add that attribute on both the entities (Opportunity and Opportunity close) and sync it between the two entities (using custom logic) in order to keep the data in sync. And make sure it is read-only on the Opportunity entity so that it is not updated once the opportunity is closed.
- Since the users are able to see the Opportunity close entity records (which basically uses the Information form of this entity, as shown in the screenshot above), you want to make sure to add to the Information form, any custom field that you added to the Quick Create form.
And that’s all you need to know about this particular customization. Do give it a try and let us know how your client liked it.
Author’s bio:
Mohona is a Content Writer for the Marketing team in AhaApps since 2019. When she is not busy attending to her creative, technical side, she likes to binge on sitcoms on Netflix. She loves writing poems and reading short stories when she wants to break away from the humdrum of life.